

Barry McGillin
Oracle SQL Developer and Database Migration, with lots of core Oracle tech as well!Barry McGillinhttp://www.blogger.com/profile/12215907295974180145noreply@blogger.comBlogger91125
Updated: 16 hours 55 min ago
Wheres my TNS connection? SHOW TNS
Lots of users have been head scratching as to which tnsnames.ora is being found and used when connecting to the database with SQLDeveloper and with SQLcl.
In the latest release we've added another new command.
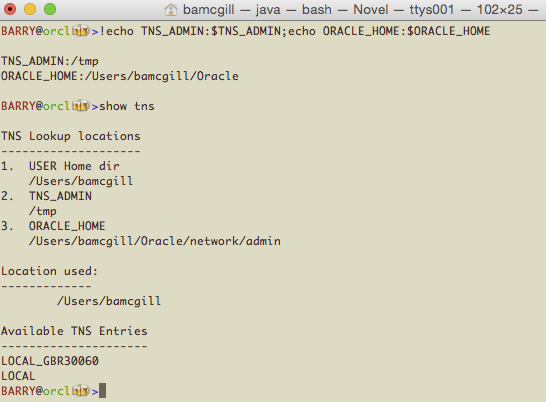
What this will do is walk the locations where we look for tnsnames.ora and list these out in order. Then it will tell you which one the tool will actually use and list the entries for you.
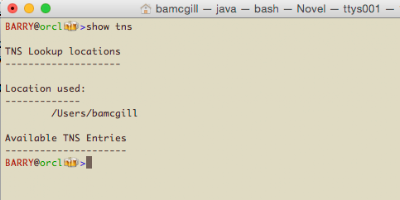
So, with nothing set, no ORACLE_HOME, no TNS_ADMIN, here's what you get. TNS is going to look in your home directory for a file called tnsnames.ora or .tnsnames.
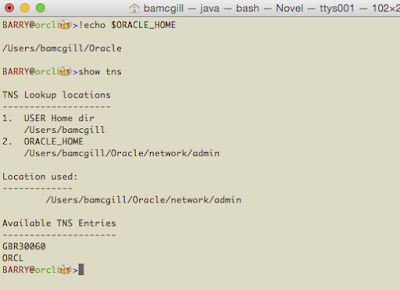
Now, if we have an ORACLE_HOME set, we'll look for $ORACLE_HOME/network/admin/tnsnames.ora
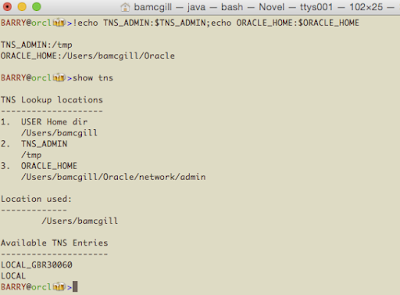
Further, if we set TNS_ADMIN, it will override ORACLE_HOME and go to that location as shown here.

Lastly, we'll come back to the User directory. If you have a tnsnames.ora there or a .tnsnames, it will override everything and this is what will be used.
Now, go ahead and make a connection. You can then do another new command called
which will show you how you are connected and what you are connected to.
Finally, you can get a look at which driver you are using for a connection using
which will show something like this, detailing types, versions and the URL of the connection you have.

In the latest release we've added another new command.
SHOW TNS
What this will do is walk the locations where we look for tnsnames.ora and list these out in order. Then it will tell you which one the tool will actually use and list the entries for you.
So, with nothing set, no ORACLE_HOME, no TNS_ADMIN, here's what you get. TNS is going to look in your home directory for a file called tnsnames.ora or .tnsnames.

Now, if we have an ORACLE_HOME set, we'll look for $ORACLE_HOME/network/admin/tnsnames.ora

Further, if we set TNS_ADMIN, it will override ORACLE_HOME and go to that location as shown here.

Lastly, we'll come back to the User directory. If you have a tnsnames.ora there or a .tnsnames, it will override everything and this is what will be used.
Now, go ahead and make a connection. You can then do another new command called
SHOW CONNECTION
which will show you how you are connected and what you are connected to.

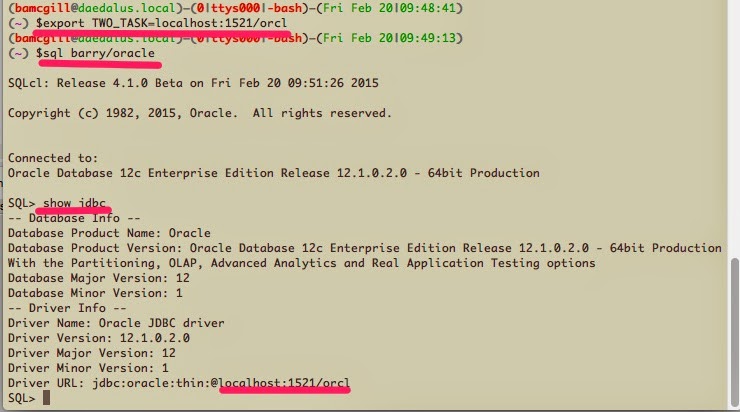
Finally, you can get a look at which driver you are using for a connection using
SHOW JDBC
which will show something like this, detailing types, versions and the URL of the connection you have.

SQLcl - Cloud connections via Secure Shell tunnels
We're always trying to make SQLcl easier to connect to your database, whether its at your place or in the cloud. So, one other thing we have added to enable you to drill into your cloud databases is an SSHTUNNEL command. Lets take a look at the help for it, which you can get as follows.
So for this to work we need to decide which ports locally we are going to use and which remote machine and port we want to use to map our ports from local to remote. We also need a RSA file from the target host. In this example, we have created one with the default name of id_rsa.
The format of the flags follow the standard ssh rules and options, so -i for identity files and -L for port forwarding. Heres an example connecting to a remote host via a tunnel.
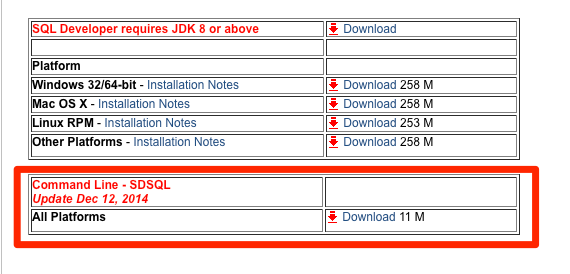
You can download SQLcl from OTN here and give this a try when the next EA is released.
SQL> help sshtunnel
SSHTUNNEL
---------

Creates a tunnel using standard ssh options
such as port forwarding like option -L of the given port on the local host
will be forwarded to the given remote host and port on the remote side. It also supports
identity files, using the ssh -i option
If passwords are required, they will be prompted for.

SSHTUNNEL <username>@<hostname> -i <identity_file> [-L localPort:Remotehost:RemotePort]

Options

-L localPort:Remotehost:Remoteport

Specifies that the given port (localhost) on the local (client) host is to be forwarded to
the given remote host (Remotehost) and port (Remoteport) on the remote side.  This works by
allocating a socket to listen to port on the local side.
Whenever a connection is made to this port, the connection is forwarded over
the secure channel, and a connection is made to remote host & remoteport from
the remote machine.

-i identity_file
Selects a file from which the identity (private key) for public key authentication is read.


SQL>
So for this to work we need to decide which ports locally we are going to use and which remote machine and port we want to use to map our ports from local to remote. We also need a RSA file from the target host. In this example, we have created one with the default name of id_rsa.
The format of the flags follow the standard ssh rules and options, so -i for identity files and -L for port forwarding. Heres an example connecting to a remote host via a tunnel.
(bamcgill@daedalus.local)–(0|ttys000|-bash)–(Mon May 04|12:16:46)
(~/.ssh) $sql /nolog

SQLcl: Release 4.1.0 Release Candidate on Mon May 04 00:16:58 2015

Copyright (c) 1982, 2015, Oracle.  All rights reserved.


SQL> sshtunnel bamcgill@gbr30060.uk.oracle.com -i ./id_rsa -L 8888:gbr30060.uk.oracle.com:1521

Password for bamcgill@gbr30060.uk.oracle.com ********
ssh tunnel connected

SQL> connect barry/oracle@localhost:8888/DB11GR24
Connected

SQL> select 'test me' as BLRK from dual weirdtable

BLRK
-------
test me


SQL>
You can download SQLcl from OTN here and give this a try when the next EA is released.
SQLcl - Code editing on the console
We've been playing with our console drawing in SQLcl for a while now and this week, we hooked up some keys to make editing and running much easier. The video will show the following keys for managing your buffer in the console. This will make it into the next Early Access candidate soon.
- up arrow - previous history (this will continue to show you the next history unless you move into the text to edit it.
- down arrow - next history which is the same as above.
If we are editing and not showing history, then the up and down arrow will move up and down the buffer.
- ctrl-W will take you to the top left of the buffer and ctrl-S will take you to the bottom of the buffer.
- left arrow moves right, with ctrl-A taking you to extreme left of that line
- right arrow moves right and ctrl-E takes you to the extreme right of that line
- ESC takes you out of edit mode, back to the SQL> prompt
- ctrl-R will execute your buffer if you are editing it.
Editing SQL in SQLcl
At the start of the video, we paste in a large piece of SQL from Kris' blog and all NBSP get stripped out so you get the full SQL and none of the dross.
If you are at the end of the buffer and terminate your statement correctly, the next CR will run the contents of your buffer. If you are anywhere else in the buffer, ctrl-R will run the buffer for you.
Check out the latest one on OTN and come back for these features when we drop the new version of SQLcl on OTN.
SQLcl connections - Lazy mans SQL*Net completion
Turloch posted this today, which is like aliases for SQL*Net connection URL's which are used to connections like this:
This works great and you can simplify your connection strings that you use. Vadim wired this into the code completion and we can now code complete via key, a connection string that you have used before or you can set up a new now using the net command.

connect <USERNAME>/<Password>@URL
This works great and you can simplify your connection strings that you use. Vadim wired this into the code completion and we can now code complete via key, a connection string that you have used before or you can set up a new now using the net command.
Connections Types in SQLcl
We support many ways to connect in SQLcl, including lots from SQL*Plus which we need to support to make sure all your SQL*Plus scripts work exactly the same way using SQLcl as with SQL*Plus.
I've added several ways to show how to connect to SQLcl. If there is one you want to see added that is not here, let me know and I'll add it to the list. So far, We have below:
- EZConnect
- TWO_TASK
- TNS_ADMIN
- LDAP
EZCONNECT
The easy connect naming method eliminates the need for service name lookup in the tnsnames.ora files for TCP/IP environments. It extends the functionality of the host naming method by enabling clients to connect to a database server with an optional port and service name in addition to the host name of the database:
 $sql barry/oracle@localhost:1521/orcl
 SQLcl: Release 4.1.0 Beta on Fri Feb 20 10:15:12 2015
 Copyright (c) 1982, 2015, Oracle. All rights reserved.
 Connected to:
 Oracle Database 12c Enterprise Edition Release 12.1.0.2.0 - 64bit Production
 SQL>
TWO_TASK
The TWO_TASK (on UNIX) or LOCAL (on Windows) environment variable can be set to a connection identifier. This removes the need to explicitly enter the connection identifier whenever a connection is made in SQL*Plus or SQL*Plus Instant Client.
In SQLcl, we can set this up as a jdbc style connection like this
$export TWO_TASK=localhost:1521/orcl
TNS_ADMIN
Local Naming resolves a net service name stored in a tnsnames.ora file stored on a client. We can set the location of that in the TNS_ADMIN variable.
$export TNS_ADMIN=~/admin An example tons entry is shown here below.
 $cat tnsnames.ora
 BLOG =
 (DESCRIPTION =
 (ADDRESS=(PROTOCOL=tcp)(HOST=localhost)(PORT=1521) )
 (CONNECT_DATA=
 (SERVICE_NAME=orcl) ) )
we can then use the entry to connect to the database.
 $sql barry/oracle@BLOG
 SQLcl: Release 4.1.0 Beta on Fri Feb 20 10:29:14 2015
 Copyright (c) 1982, 2015, Oracle. All rights reserved.
 Connected to:
 Oracle Database 12c Enterprise Edition Release 12.1.0.2.0 - 64bit Production
 SQL>
LDAP
We've already written about LDAP connections here. Here's a quick review.
set LDAPCON jdbc:oracle:thin:@ldap://scl58261.us.oracle.com:389/#ENTRY#,cn=OracleContext,dc=ldapcdc,dc=lcom
 $export LDAPCON=jdbc:oracle:thin:@ldap://scl58261.us.oracle.com:389/#ENTRY#,cn=OracleContext,dc=ldapcdc,dc=lcom
 $sql /nolog
 SQLcl: Release 4.1.0 Beta on Fri Feb 20 10:37:02 2015
 Copyright (c) 1982, 2015, Oracle. All rights reserved.
 SQL> connect barry/oracle@orclservice_test(Emily's Desktop)
 Connected
 SQL>
If we have more types to add, then they will appear here. Let us know what you want to see.
Code Insight on SQLcl
Here's a little preview of the code insight we have in SQLcl. These changes are part of EA2 which are coming out very soon. This also shows the buffer and cursor management which was introduced in SQLcl
This allows you to move around the buffer easily and add and change text as you would in a normal text editor, not a console window like this.
We're also adding hotkeys to run the buffer from anywhere or to jump out of the buffer to do something else without losing the contents of the buffer.
Stayed tuned for this soon.
B
SQLCl - LDAP anyone?
since we released our first preview of SDSQL, we've made a lot of changes to it and enhanced a lot of things too in there so it would be more useable. One specific one was the use of LDAP which some customers on SQLDeveloper are using in their organisations as a standard and our first release precluded them from working with this.
Well, to add this, we wanted a way that we could specify the LDAP strings and then use them in a connect statement. We introduced a command called SET LDAPCON for setting the LDAP connection. You can set it like this at the SQL> prompt
or set it as an environment variable
Then you can come along and as long as you know your service name, we're going to swap out the ENTRY delimiter in the LDAP connection with your service. We're working on a more permanent way to allow these to be registered and used so they are more seamless.
In the meantime, you can then connect to your LDAP service like this
Here's a qk little video of it in action! You can then use the 'SHOW JDBC' command to show what you are connected to.
This is the latest release which should be online soon, and you can download it from here.
Well, to add this, we wanted a way that we could specify the LDAP strings and then use them in a connect statement. We introduced a command called SET LDAPCON for setting the LDAP connection. You can set it like this at the SQL> prompt
set LDAPCON jdbc:oracle:thin:@ldap://scl58261.us.oracle.com:389/#ENTRY#,cn=OracleContext,dc=ldapcdc,dc=lcom
or set it as an environment variable
(~/sql) $export LDAPCON=jdbc:oracle:thin:@ldap://scl58261.us.oracle.com:389/#ENTRY#,cn=OracleContext,dc=ldapcdc,dc=lcom
Then you can come along and as long as you know your service name, we're going to swap out the ENTRY delimiter in the LDAP connection with your service. We're working on a more permanent way to allow these to be registered and used so they are more seamless.
In the meantime, you can then connect to your LDAP service like this
 BARRY@ORCL>set LDAPCON jdbc:oracle:thin:@ldap://scl58261.us.oracle.com:389/#ENTRY#,cn=OracleContext,dc=ldapcdc,dc=lcom
 BARRY@ORCL>connect barry/oracle@orclservice_test(Emily's Desktop)
 Connected
 BARRY@PDBOH12>tables
 Command=tables
 TABLES
 TEST
Here's a qk little video of it in action! You can then use the 'SHOW JDBC' command to show what you are connected to.
This is the latest release which should be online soon, and you can download it from here.
SDSQL - Editing Anyone?
Since we dropped our beta out of SQLDeveloper 4.1 and announced SDSQL, we've been busy getting some of the new things out to users. We support SQL*plus editing straight out of the box, but one thing that was always annoying was the time when you make a mistake and can't fix it to you have finished typing to go back and add a line like this.

This was always the way as console editors didn't let you move around, the best you could hope for on the command line was a decent line editor and anything above was printed to the screen and not accessible unless through commands like you see here in the images about..
Well, not any more. In SDSQL we've taken a look at several things like history, aliases and colors and we've now added a separate multiline console editor which allows you to walk up and down your buffer and make all the changes you want before executing? Sounds normal, right? So, thats what we did. Have a look and tell us what you think.
SQLDev: How unshared worksheets should work!
Unshared worksheets are created to have a private connection to the database. When that unshared worksheet is closed, the connection and session for it should disappear as well.
This graphic shows what should happen!
Setting up Eclipse with SVN on OSX Mavericks
So My macbook pro died the other day and much to my wife's amusement, my dell laptop died 30 minutes later with disk errors as I hadn't used in it in forever. She wasn't laughing long though cos I swiped her Macbook Air to get me out of a hole while the Apple store replace the magsafe card. (Don't worry, though, cos Lisa grabbed one of the kids laptops and now they are the only ones fuming. )
So, here we are, no development environment to speak of on this laptop, not even Xcode tools or anything and a release to go out! First thing out of the box was to down load eclipse, from eclipse.org, which at time of writing is still keplar.
 Download it, and expand it. then take the complete eclipse folder and drop it into your /Applications folder. It'll look like this.

 As you can see, we have a preference called installed JRE's which, when we click on it will only have the apple JDK we installed when we first tried to start eclipse. I want JDK 8 and JDK 7 and I got them on the oracle site for Java. Download both dmg files from Oracle, double click them and follow the instructions on the installer to drop them in. If you restart eclipse, and go back to the preferences, to this page you will now see the appropriate JDKs installed and you can choose your default for your project.

Badda Bing. Now, we can install subversion from the Brew repository and as all homebrew experts know, you keep your home-brews in the Cellar, so look out for /usr/local/Cellar appearing. Now you may be asked for your administrator passwords as you do this because brew setups up the Cellar under /usr/Local and needs to create that there if it does not exist and set the permissions on the directory.
Next, we'll want to install subversion with Brew.

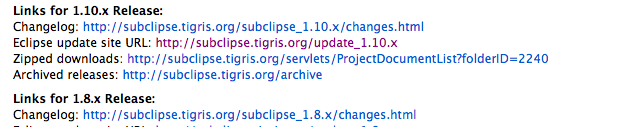
What we want to pick up is the Eclipse update Site URL. We can then take that and use it in eclipse to install subclipse for us.
So. Open eclipse again and go to HELP > Install New Software
 This will popup the window below for available software and if you use the drop box, you'll see things like eclipse and myln and other update sites which base eclipse uses.
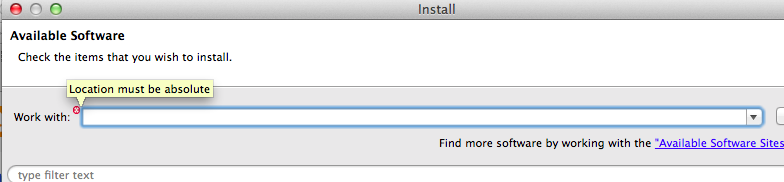 We need to add another for Subclipse. Remember we grabbed the update url from the Subclipse site, we can add a new site by clicking add and pasting in the URL and a name for the site as shown.
 This will appear like this and will give you the options that below to install subclipse and the SVNKit.

Install these and its normally good to restart eclipse after these installs. The last thing you need to do then is to make sure you are using the right svnkit in eclipse once you restart.
You can make sure of this by going to the preferences again and searching for SVN. Click on the main SVN preference and make sure the SVN interface is set to SVNKit instead of javaHL.

Now, svn should be all set up and you can go look at adding new repositories and checking out code.
So, here we are, no development environment to speak of on this laptop, not even Xcode tools or anything and a release to go out! First thing out of the box was to down load eclipse, from eclipse.org, which at time of writing is still keplar.
Also, when you click on the Launcher, you'll see eclipse added to the list of applications.
Now, When you run it, you may be asked if you want to install java 1.6 to run Eclipse. Accept the install and sit back until it completes. When its installed, you'll be able to run eclipse, so click the icon in the launcher, as above.
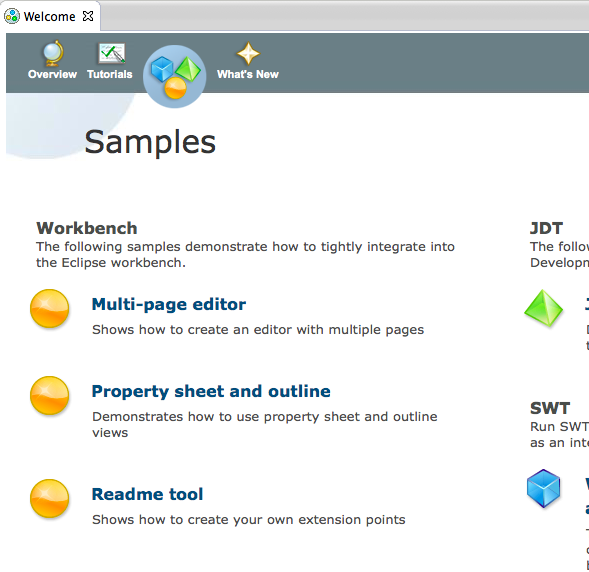
Eclipse will appear like this below.
We'll want to see what java versions we have installed and for that you can go to preferences and type jdk into the filter box which will show a number of java related options.
As you can see, we have a preference called installed JRE's which, when we click on it will only have the apple JDK we installed when we first tried to start eclipse. I want JDK 8 and JDK 7 and I got them on the oracle site for Java. Download both dmg files from Oracle, double click them and follow the instructions on the installer to drop them in. If you restart eclipse, and go back to the preferences, to this page you will now see the appropriate JDKs installed and you can choose your default for your project. Now, part two. Getting subversion into your eclipse, which turns out to be kinda difficult when you are trying to figure out which path to do. There are various schools of thought on how to get subversion on to your mac, but for me so far, I have found Brew to be one of the best of the latest package installers out there. If you do not have Brew installed you can do that really quickly by running this command in a terminal window.
which gets you this output.
lisas-MacBook-Air:~ bamcgill$ ruby -e "$(curl -fsSL https://raw.github.com/mxcl/homebrew/go/install)"
==> This script will install:
/usr/local/bin/brew
/usr/local/Library/...
/usr/local/share/man/man1/brew.1

Press RETURN to continue or any other key to abort
==> /usr/bin/sudo /bin/chmod g+rwx /Library/Caches/Homebrew
==> Downloading and installing Homebrew...
remote: Counting objects: 169292, done.
remote: Compressing objects: 100% (47341/47341), done.
remote: Total 169292 (delta 120836), reused 169278 (delta 120826)
Receiving objects: 100% (169292/169292), 32.51 MiB | 121 KiB/s, done.
Resolving deltas: 100% (120836/120836), done.
From https://github.com/Homebrew/homebrew
 * [new branch]      master     -> origin/master
HEAD is now at 23e1c24 ansible: fix --HEAD install
==> Installation successful!
You should run `brew doctor' *before* you install anything.
Now type: brew help
lisas-MacBook-Air:~
Next, we'll want to install subversion with Brew.
This will install subversion and its dependencies for you.
Now, lastly, you'll need to install SVN support on eclipse. The best one I've seen and have been using for ages has been Subclipse from Tigris.org. If you go to the download page, you'll see some notes on the download pages and sections for each release like this
So. Open eclipse again and go to HELP > Install New Software
Install these and its normally good to restart eclipse after these installs. The last thing you need to do then is to make sure you are using the right svnkit in eclipse once you restart.
You can make sure of this by going to the preferences again and searching for SVN. Click on the main SVN preference and make sure the SVN interface is set to SVNKit instead of javaHL.
Convert SQLServer to Oracle using files - Part 4
This, the last part of a four part tutorial goes over the movement of data using files generated by Oracle SQL Developer. In part 1 we generated the offline capture scripts to take to the SQL Server machine, unloaded the metadata, zipped it up and copied it back to out local machine. In part 2 we used SQL Developer to create a migration project and load the capture files into SQL Developer. We then converted the metadata into its Oracle equivalent. In Part 3, we were able to generate DDL and run this DDL against an Oracle database.


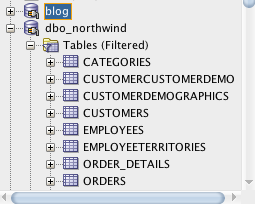
We can now take a look at some data in the Oracle database by going to the dbo_northwind connection we made earlier and look at the data.

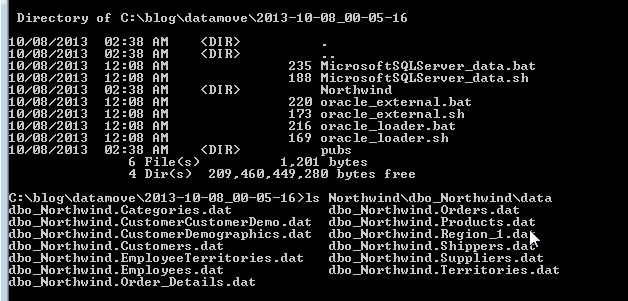
Looking at the data move scripts that we generated in an earlier part. We need to zip up the files and copy them to the SQL Server machine to run. Lets look at that now. The images below show the files moved to our SQLServer machine. We go into the main directory under data move and run the bat file MicrosoftSQLServer_data.bat. This batch file takes a number of parameters
This script then unloads the data from the database for the databases selected earlier. We can see the dat files in the image above. Now, we just need to go and transfer the data to the Oracle database machine for loading. We can go back out to the main datamove directory and zip up the entire directory including the scripts. We then need to ftp that to the database machine.
The files need to be unzipped on the machine and cd into the main directory until you find a file called oracle_loader.sh.
We can run the files as below. The output below shows the exact output of running the Oracle_loader.sh script on the data we have taken from SQL Server.
[oracle@Unknown-08:00:27:c8:2a:1c 2013-10-08_00-05-16]$ sh ./oracle_loader.sh orcl blog blog
/scratch/datamove/2013-10-08_00-05-16/Northwind /scratch/datamove/2013-10-08_00-05-16
/scratch/datamove/2013-10-08_00-05-16/Northwind/dbo_Northwind /scratch/datamove/2013-10-08_00-05-16/Northwind

SQL*Plus: Release 11.2.0.2.0 Production on Mon Oct 7 18:58:42 2013

Copyright (c) 1982, 2010, Oracle.  All rights reserved.


Connected to:
Oracle Database 11g Enterprise Edition Release 11.2.0.2.0 - Production
With the Partitioning, OLAP, Data Mining and Real Application Testing options

Table altered.
Table altered.
Trigger altered.
Trigger altered.
Trigger altered.
Trigger altered.
Trigger altered.
Trigger altered.
Trigger altered.
Table altered.
Table altered.
Table altered.
Table altered.
Table altered.
Table altered.
Table altered.
Table altered.
Table altered.
Table altered.
Table altered.
Table altered.
Table altered.
Table altered.
Table altered.
Table altered.
Table altered.
Table altered.
Table altered.
Disconnected from Oracle Database 11g Enterprise Edition Release 11.2.0.2.0 - Production
With the Partitioning, OLAP, Data Mining and Real Application Testing options
SQL*Loader: Release 11.2.0.2.0 - Production on Mon Oct 7 18:58:43 2013
Copyright (c) 1982, 2009, Oracle and/or its affiliates. All rights reserved.
Commit point reached - logical record count 1
Commit point reached - logical record count 2
Commit point reached - logical record count 3
Commit point reached - logical record count 4
Commit point reached - logical record count 5
Commit point reached - logical record count 6
Commit point reached - logical record count 7
Commit point reached - logical record count 8
Commit point reached - logical record count 9
SQL*Loader: Release 11.2.0.2.0 - Production on Mon Oct 7 18:58:44 2013
Copyright (c) 1982, 2009, Oracle and/or its affiliates. All rights reserved.
Commit point reached - logical record count 1
Commit point reached - logical record count 2
Commit point reached - logical record count 3
Commit point reached - logical record count 4
Commit point reached - logical record count 5
Commit point reached - logical record count 6
Commit point reached - logical record count 7
Commit point reached - logical record count 8
SQL*Loader: Release 11.2.0.2.0 - Production on Mon Oct 7 18:58:44 2013
Copyright (c) 1982, 2009, Oracle and/or its affiliates. All rights reserved.
Commit point reached - logical record count 49
SQL*Loader: Release 11.2.0.2.0 - Production on Mon Oct 7 18:58:44 2013
Copyright (c) 1982, 2009, Oracle and/or its affiliates. All rights reserved.
Commit point reached - logical record count 53
SQL*Loader: Release 11.2.0.2.0 - Production on Mon Oct 7 18:58:45 2013
Copyright (c) 1982, 2009, Oracle and/or its affiliates. All rights reserved.
SQL*Loader: Release 11.2.0.2.0 - Production on Mon Oct 7 18:58:45 2013
Copyright (c) 1982, 2009, Oracle and/or its affiliates. All rights reserved.
SQL*Loader: Release 11.2.0.2.0 - Production on Mon Oct 7 18:58:45 2013
Copyright (c) 1982, 2009, Oracle and/or its affiliates. All rights reserved.
Commit point reached - logical record count 64
Commit point reached - logical record count 77
SQL*Loader: Release 11.2.0.2.0 - Production on Mon Oct 7 18:58:45 2013
Copyright (c) 1982, 2009, Oracle and/or its affiliates. All rights reserved.
Commit point reached - logical record count 4
SQL*Loader: Release 11.2.0.2.0 - Production on Mon Oct 7 18:58:46 2013
Copyright (c) 1982, 2009, Oracle and/or its affiliates. All rights reserved.
Commit point reached - logical record count 64
Commit point reached - logical record count 128
Commit point reached - logical record count 192
Commit point reached - logical record count 256
Commit point reached - logical record count 320
Commit point reached - logical record count 384
Commit point reached - logical record count 448
Commit point reached - logical record count 512
Commit point reached - logical record count 576
Commit point reached - logical record count 640
Commit point reached - logical record count 704
Commit point reached - logical record count 768
Commit point reached - logical record count 832
Commit point reached - logical record count 896
Commit point reached - logical record count 960
Commit point reached - logical record count 1024
Commit point reached - logical record count 1088
Commit point reached - logical record count 1152
Commit point reached - logical record count 1216
Commit point reached - logical record count 1280
Commit point reached - logical record count 1344
Commit point reached - logical record count 1408
Commit point reached - logical record count 1472
Commit point reached - logical record count 1536
Commit point reached - logical record count 1600
Commit point reached - logical record count 1664
Commit point reached - logical record count 1728
Commit point reached - logical record count 1792
Commit point reached - logical record count 1856
Commit point reached - logical record count 1920
Commit point reached - logical record count 1984
Commit point reached - logical record count 2048
Commit point reached - logical record count 2112
Commit point reached - logical record count 2155
SQL*Loader: Release 11.2.0.2.0 - Production on Mon Oct 7 18:58:46 2013
Copyright (c) 1982, 2009, Oracle and/or its affiliates. All rights reserved.
Commit point reached - logical record count 64
Commit point reached - logical record count 128
Commit point reached - logical record count 192
Commit point reached - logical record count 256
Commit point reached - logical record count 320
Commit point reached - logical record count 384
Commit point reached - logical record count 448
Commit point reached - logical record count 512
Commit point reached - logical record count 576
Commit point reached - logical record count 640
Commit point reached - logical record count 704
Commit point reached - logical record count 768
Commit point reached - logical record count 830
SQL*Loader: Release 11.2.0.2.0 - Production on Mon Oct 7 18:58:47 2013
Copyright (c) 1982, 2009, Oracle and/or its affiliates. All rights reserved.
Commit point reached - logical record count 1
Commit point reached - logical record count 2
Commit point reached - logical record count 3
Commit point reached - logical record count 4
Commit point reached - logical record count 5
Commit point reached - logical record count 6
Commit point reached - logical record count 7
Commit point reached - logical record count 8
Commit point reached - logical record count 9
Commit point reached - logical record count 10
Commit point reached - logical record count 11
Commit point reached - logical record count 12
Commit point reached - logical record count 13
Commit point reached - logical record count 14
Commit point reached - logical record count 15
Commit point reached - logical record count 16
Commit point reached - logical record count 17
Commit point reached - logical record count 18
Commit point reached - logical record count 19
Commit point reached - logical record count 20
Commit point reached - logical record count 21
Commit point reached - logical record count 22
Commit point reached - logical record count 23
Commit point reached - logical record count 24
Commit point reached - logical record count 25
Commit point reached - logical record count 26
Commit point reached - logical record count 27
Commit point reached - logical record count 28
Commit point reached - logical record count 29
SQL*Loader: Release 11.2.0.2.0 - Production on Mon Oct 7 18:58:47 2013
Copyright (c) 1982, 2009, Oracle and/or its affiliates. All rights reserved.
Commit point reached - logical record count 3
SQL*Loader: Release 11.2.0.2.0 - Production on Mon Oct 7 18:58:47 2013
Copyright (c) 1982, 2009, Oracle and/or its affiliates. All rights reserved.
Commit point reached - logical record count 64
Commit point reached - logical record count 91
Disconnected from Oracle Database 11g Enterprise Edition Release 11.2.0.2.0 - Production
With the Partitioning, OLAP, Data Mining and Real Application Testing options
/scratch/datamove/2013-10-08_00-05-16/Northwind
/scratch/datamove/2013-10-08_00-05-16
[oracle@Unknown-08:00:27:c8:2a:1c 2013-10-08_00-05-16]$
We can now take a look at some data in the Oracle database by going to the dbo_northwind connection we made earlier and look at the data.
And thats it. In these four parts we have generated capture scripts from SQLDeveloper to unload metadata from SQLServer. In part two, we loaded the metadata and converted it into an Oracle version. In Part three, we generated the DDL and ran it creating the new Oracle users. In part 4, we unloaded the data and copied it to the oracle machine. We then loaded it using the scripts we generated from Oracle SQL Developer.
Convert SQLServer to Oracle using files - Part 3
In part 1 we generated the offline capture scripts to take to the SQL Server machine, unloaded the metadata, zipped it up and copied it back to out local machine. In part 2 we used SQL Developer to create a migration project and load the capture files into SQL Developer. We then converted the metadata into its Oracle equivalent.
 In this episode we will try and generate DDL from our migration project. Right now, We can see the Oracle objects in the Converted Database Objects node.
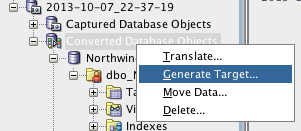 If we right click on Converted Database objects and choose generate, we can generate DDL to create the Oracle Schema and Objects.
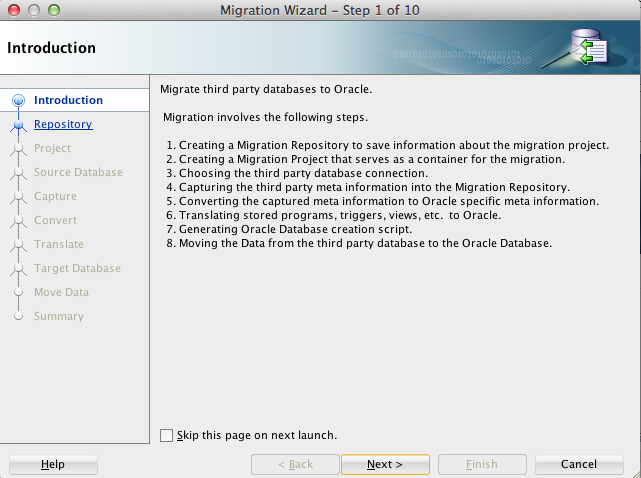 The wizard appears again with the introduction screen. Clicking next takes us directly to the Target database Screen.
 You can select what way you want to generate your files, all in one file, a file per object type or a file per object. You can also choose the types of objects you want to generate and run.
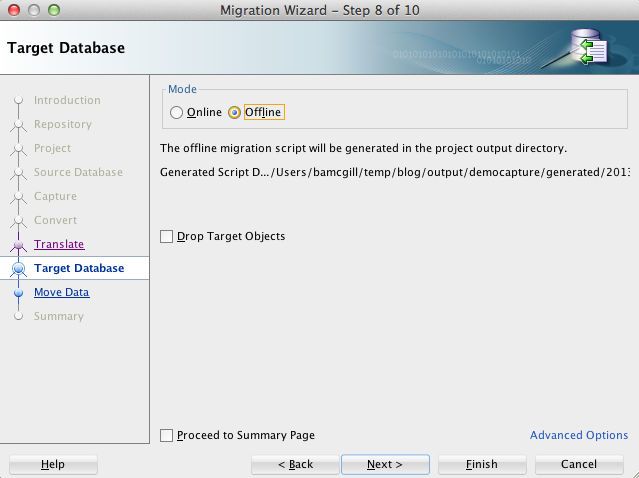
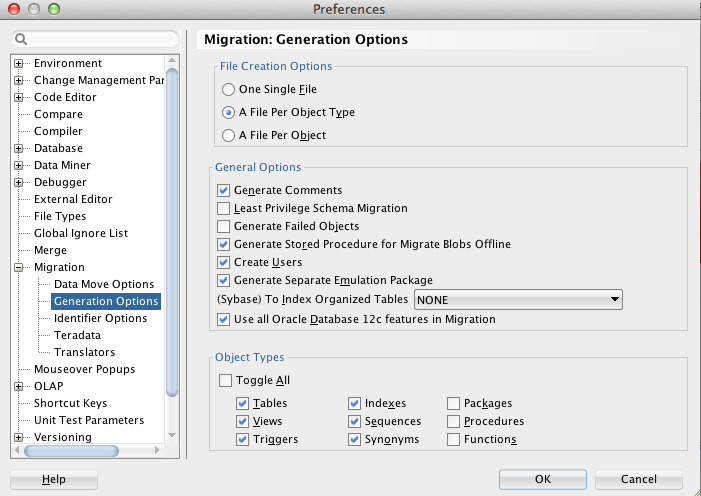 In this demo, I will just generate tables, data and supporting objects. Clicking next will take us to the data move page where we again choose offline to generate files.
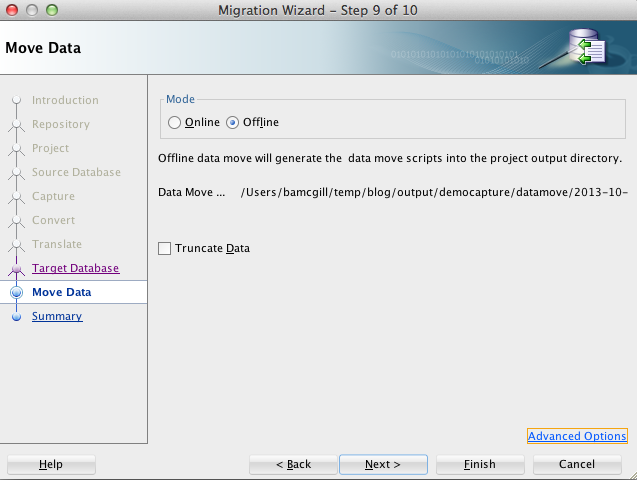 Choosing advanced options allows us to be specific about date masks and delimiters for data unload.
 Once we have chosen our options, we click next and review the summary.
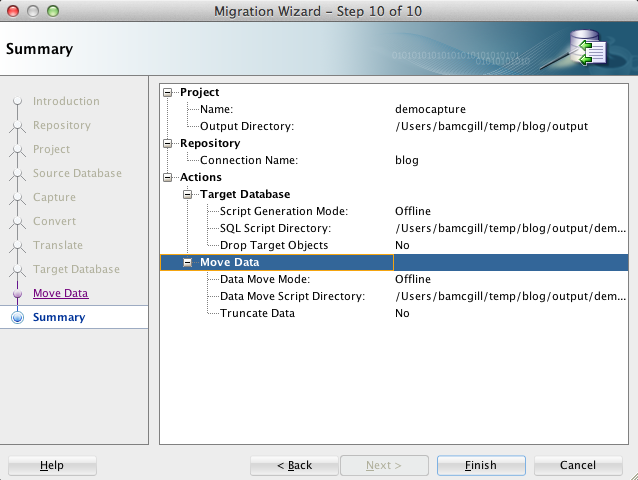 Finally, we click finish and the files are generated in the output directory we specified when setting up the project in part 2.
 Now, Lets go see what we generated. If we go to the output directory we specified in the project, we can see the list of files we generated. Remember the options we chose for generation.

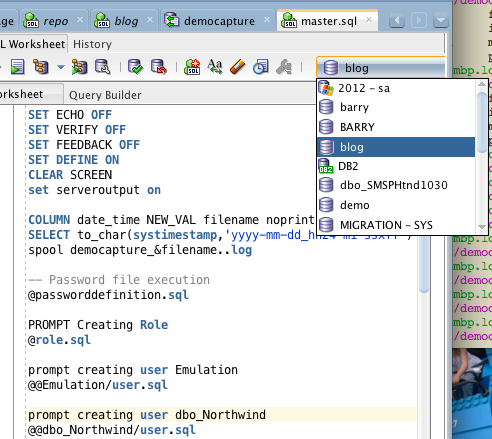
Now, lets try and run this file and create the users and objects. Firstly, we choose a connection to run the script. This user must have the privileges to create users and all their ancillary objects.

If we right click on Converted Database objects and choose generate, we can generate DDL to create the Oracle Schema and Objects.The wizard appears again with the introduction screen. Clicking next takes us directly to the Target database Screen.Click on offline to choose generation of files. For specifics of how the files get generated, click on advanced options
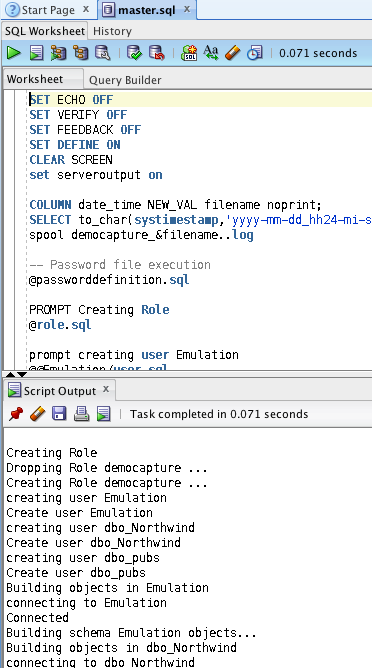
We also get the master.sql file opened in SQL Developer which looks like this
SET ECHO OFF
SET VERIFY OFF
SET FEEDBACK OFF
SET DEFINE ON
CLEAR SCREEN
set serveroutput on

COLUMN date_time NEW_VAL filename noprint;
SELECT to_char(systimestamp,'yyyy-mm-dd_hh24-mi-ssxff') date_time FROM DUAL;
spool democapture_&filename..log

-- Password file execution
@passworddefinition.sql

PROMPT Creating Role
@role.sql

prompt creating user Emulation
@@Emulation/user.sql

prompt creating user dbo_Northwind
@@dbo_Northwind/user.sql

prompt creating user dbo_pubs
@@dbo_pubs/user.sql

prompt Building objects in Emulation
@@Emulation/master.sql

prompt Building objects in dbo_Northwind
@@dbo_Northwind/master.sql

prompt Building objects in dbo_pubs
@@dbo_pubs/master.sql
Now, lets try and run this file and create the users and objects. Firstly, we choose a connection to run the script. This user must have the privileges to create users and all their ancillary objects.
We can run this script to create the users. Notice the worksheet output showing the output of the files.
Once this is complete, we can create a connection in SQL Developer to one of the users created, dbo_Northwind, dbo_pubs and emulation.
Now, we have created the schema from the DDL which was generated. In the next and final episode of this, we will visit the data move. We will run the data move scripts on SQL Server and extract the data which we can load via SQL Loader or external tables.
Convert SQL Server to Oracle using files - Part 2
Ok, Now we have the files as generated and moved in part 1, we can now start SQL Developer to load the files. Start up SQL Developer and create a connection with the following privileges: CONNECT, RESOURCE and CREATE VIEW.
 When the connection is opened, right click on it and choose Migration Repository then Associate Migration Repository. This will create the repository in the connection.

 Now, We can start the migration wizard. You can do this by either going to the tools menu and selecting migrate from the migration menu, or you can select the migrate icon from the migration project navigator. The wizard will popup and you can walk through the steps as outlined below.
 Clicking the next button selects the repository page which we can choose the repository connection we just made.
 Next page and we need to create a project to hold the captured databases.

 This offline capture file is in the zip file we brought over from SQL Server. Browse to the sqlserver2008.ocp. This file tells SQL Developer what to expect in the directory. It will look for the databases that have been unloaded.
 When its selected, SQL Developer parses the files and shows you a list of the databases you ran the offline capture scripts for in Part 1.
 Choose both databases and click next.
 The next page shows a list of the datatypes of SQL Server on the left and a list of equivalent data types on the right. You can choose a different type if you want and you can also create a new mapping by clicking on the "Add new Rule".
 The next page lists the objects to be translated. Because we have not captured anything yet, the best we can do is to tell SQL Developer to translate everything. We can come back later and choose specific stored programs to convert and translate.
 At this stage, we can click proceed to summary and then finish once you review the summary page.
 When finish is pressed, SQL Developer will capture the database metadata from the files and convert it to its Oracle equivalent.

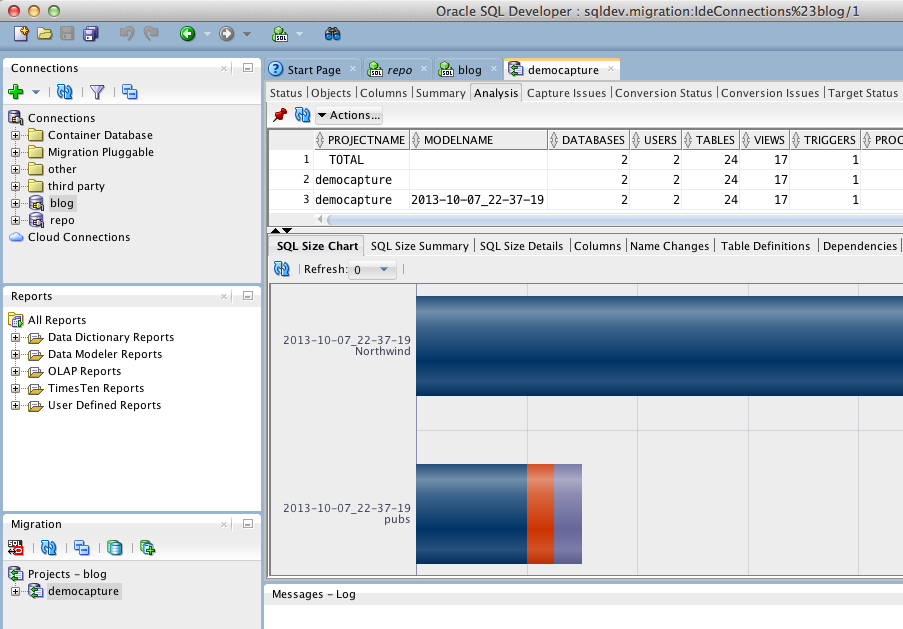
 When this completes, you will see a new node with the project name you chose earlier. If you click on it, you will get an editor on the right hand side with a summary of the data captured and converted.

The output directory in the page above is the directory where any log files or generated files will be placed. When we generate DDL or data move files, this is where they will get generated. Next page is the capture page. For using the files from Part 1, we need to choose offline which will then show the page below, which asks us to select the offline capture file.
Convert SQL Server to Oracle using files - Part 1
Many people want to migrate their SQL Server databases and do not have direct network access to the database. In Oracle SQL Developer, we can migrate from SQL Developer to Oracle using a connection to SQL Server or using files to extract the metadata from SQL Server and convert it to an Oracle equivilent.
Today, we'll show you how to use scripts to convert SQL Server. First we need to start up SQL Developer and choose the Tools menu, then select Migration and Create Offline Capture Scripts
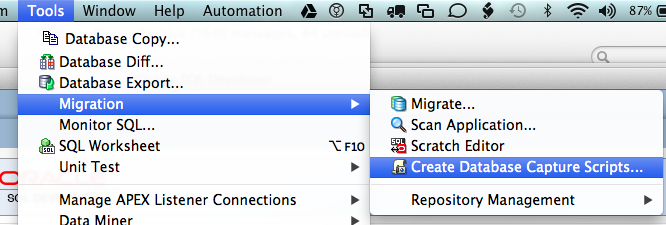
When the dialog appears, choose the SQL Server and the appropriate version you want. You will also need to choose a directory to put the scripts into.
 This will generate a set of files which we will need to move to our SQL Server machine to run.
 So on disk, these look like this.
 Now, we can zip this up and ftp it to the SQL Server machine you want to migrate, or in my case, I'll scp it to the machine.


This will unload the metadata from the database to flat files. You need to run this script once for each database you want to migrate. You'll see something like these as you go.

 This is one run for the northwind database. I've run this again for the pubs database and lets look and see what files exist now.
 Now, we go up a directory and zip all this up so we can move it to the machine where we will translate it.
 Now, we can move that zip file. Take a look at it, it is very small in size for this demo, but even for a large system, we are only capturing the metadata structure of the database. If you are working with a partner or SI, this is the file you will want to send them for analysis.
Ok, for those of you who are doing this right now, read on.
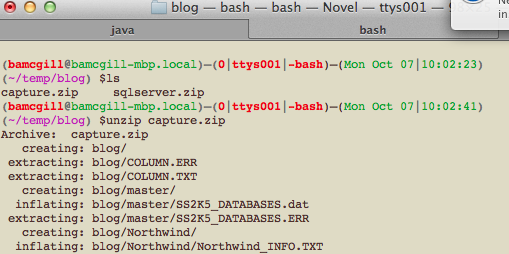
When you have the capture.zip file transferred, unzip it into a clean directory. We will use SQL Developer on this to convert these metadata files into DDL to create the new Oracle schema and the data move scripts which can be used to unload the data from SQL Server and load it into Oracle.
Today, we'll show you how to use scripts to convert SQL Server. First we need to start up SQL Developer and choose the Tools menu, then select Migration and Create Offline Capture Scripts
When the dialog appears, choose the SQL Server and the appropriate version you want. You will also need to choose a directory to put the scripts into.
Now, lets go to SQL Server and run the scripts against the SQL Server database. Looking below, I have opened up a command window and created a directory called blog and moved the sqlserver.zip file into that directory.
Now, we have the scripts on the SQL Server box and ready to run. Its important that when you run the scripts on a server, that you always run it from the same place. The script which is run takes a number of parameters to run.
OMWB_OFFLINE_CAPTURE sa superuser_password databasename server
OMWB_OFFLINE_CAPTURE sa saPASSWORD DBNAME_TO_CAPTURE SQLSERVER_SERVER
This will unload the metadata from the database to flat files. You need to run this script once for each database you want to migrate. You'll see something like these as you go.
Ok, for those of you who are doing this right now, read on.
When you have the capture.zip file transferred, unzip it into a clean directory. We will use SQL Developer on this to convert these metadata files into DDL to create the new Oracle schema and the data move scripts which can be used to unload the data from SQL Server and load it into Oracle.
Now, we use SQL Developer to load this data. We will need access to an Oracle database to create a schema to use as a repository. The repository is used to hold the source database information and the converted data.
The next post will walk through SQL Developer loading these files and converting the metadata to an Oracle equivalent.
Configuring ODBC to MySQL from Oracle
Sometimes people want to connect to MySQL from Oracle and copy table data between the databases. You can do that with Oracle Hetrogenous Services via ODBC. This post will show how to create an odbc connection to your MySQL database which is the first part of this.
For my example, I'm using unixODBC and its on the Oracle public yum repository
Now make sure odbc connector is installed for MySQL. Again, we're using our friend yum to provide it
Now lets check driver locations and DSNs. Firstly we can check the installed drivers now in the file /etc/odbcinst.ini
NB: If you get an error at this stage asking for libraries, its likely you specified your Drivers incorrectly in the odbcinst.ini.
Now we have this working we can setup HS on the Oracle side.
For my example, I'm using unixODBC and its on the Oracle public yum repository
[root@localEL5 ~]$ yum install unixODBC
Loaded plugins: security
Setting up Install Process
Resolving Dependencies
> Running transaction check
> Processing Dependency: libboundparam.so.1 for package: unixODBC-devel
> Processing Dependency: libesoobS.so.1 for package: unixODBC-devel
> Processing Dependency: libgtrtst.so.1 for package: unixODBC-devel
> Processing Dependency: libmimerS.so.1 for package: unixODBC-devel
> Processing Dependency: libnn.so.1 for package: unixODBC-devel
> Processing Dependency: libodbc.so.1 for package: unixODBC
.....
> Running transaction check
> Package unixODBC-devel.i386 0:2.2.11-10.el5 set to be updated
> Package unixODBC-libs.i386 0:2.2.11-10.el5 set to be updated
> Finished Dependency Resolution

Dependencies Resolved

================================================================================
 Package               Arch        Version              Repository         Size
================================================================================
Updating:
 unixODBC              i386        2.2.11-10.el5        el5_latest        290 k
Installing for dependencies:
 unixODBC-libs         i386        2.2.11-10.el5        el5_latest        551 k
Updating for dependencies:
 unixODBC-devel        i386        2.2.11-10.el5        el5_latest        738 k

Transaction Summary
================================================================================
Install       1 Package(s)
Upgrade       2 Package(s)

Total download size: 1.5 M
Is this ok [y/N]: y
Downloading Packages:
(1/3): unixODBC-2.2.11-10.el5.i386.rpm                   | 290 kB     00:02
(2/3): unixODBC-libs-2.2.11-10.el5.i386.rpm              | 551 kB     00:04
(3/3): unixODBC-devel-2.2.11-10.el5.i386.rpm             | 738 kB     00:17
--------------------------------------------------------------------------------
Total                                            60 kB/s | 1.5 MB     00:26
Running rpm_check_debug
Running Transaction Test
Finished Transaction Test
Transaction Test Succeeded
Running Transaction
  Installing     : unixODBC-libs                                            1/5
warning: /etc/odbcinst.ini created as /etc/odbcinst.ini.rpmnew
  Updating       : unixODBC                                                 2/5
  Updating       : unixODBC-devel                                           3/5
  Cleanup        : unixODBC                                                 4/5
  Cleanup        : unixODBC-devel                                           5/5

Dependency Installed:
  unixODBC-libs.i386 0:2.2.11-10.el5

Updated:
  unixODBC.i386 0:2.2.11-10.el5

Dependency Updated:
  unixODBC-devel.i386 0:2.2.11-10.el5

Complete!
[root@localEL5 ~]$
Now make sure odbc connector is installed for MySQL. Again, we're using our friend yum to provide it
[root@localEL5 ~]$  yum install mysql-connector-odbc
Loaded plugins: security
Setting up Install Process
Resolving Dependencies
There are unfinished transactions remaining. You might consider running yum-complete-transaction first to finish them.
The program yum-complete-transaction is found in the yum-utils package.
> Running transaction check
...
> Finished Dependency Resolution

Dependencies Resolved

=================================================================================================
 Package                      Arch         Version                      Repository          Size
=================================================================================================
Installing:
 mysql-connector-odbc         i386         3.51.26r1127-2.el5           el5_latest         159 k
Installing for dependencies:
 libtool-ltdl                 i386         1.5.22-7.el5_4               el5_latest          37 k

Transaction Summary
=================================================================================================
Install       2 Package(s)
Upgrade       0 Package(s)

Total download size: 196 k
Is this ok [y/N]: y
Downloading Packages:
(1/2): libtool-ltdl-1.5.22-7.el5_4.i386.rpm                               |  37 kB     00:04
(2/2): mysql-connector-odbc-3.51.26r1127-2.el5.i386.rpm                   | 159 kB     00:01
-------------------------------------------------------------------------------------------------
Total                                                             21 kB/s | 196 kB     00:09
Running rpm_check_debug
Running Transaction Test
Finished Transaction Test
Transaction Test Succeeded
Running Transaction
  Installing     : libtool-ltdl                                                              1/2
  Installing     : mysql-connector-odbc                                                      2/2

Installed:
  mysql-connector-odbc.i386 0:3.51.26r1127-2.el5

Dependency Installed:
  libtool-ltdl.i386 0:1.5.22-7.el5_4

Complete!
[root@localEL5 ~]$
Now lets check driver locations and DSNs. Firstly we can check the installed drivers now in the file /etc/odbcinst.ini
# driver definitinions
#
#

# Included in the unixODBC package
[PostgreSQL]
Description     = ODBC for PostgreSQL
Driver          = /usr/lib/libodbcpsql.so
Setup           = /usr/lib/libodbcpsqlS.so
FileUsage       = 1


# Driver from the MyODBC package
# Setup from the unixODBC package
[MySQL]
Description     = ODBC for MySQL
Driver          = /usr/lib/libmyodbc.so
Setup           = /usr/lib/libodbcmyS.so
FileUsage       = 1
[sakila-connector]
driver=MySQL
Database=sakila
Socket=/var/lib/mysql/mysql.sock
User=root
Password=oracle
[oracle@Unknown-08:00:27:c8:2a:1c lib]$ isql -v sakila-connector
+---------------------------------------+
| Connected!                            |
|                                       |
| sql-statement                         |
| help [tablename]                      |
| quit                                  |
|                                       |
+---------------------------------------+
NB: If you get an error at this stage asking for libraries, its likely you specified your Drivers incorrectly in the odbcinst.ini.
Now we have this working we can setup HS on the Oracle side.
Configuring MySQL on EL5, Setting Passwords and Network Access
I find myself installing and running mysql of different versions in different places for different reasons all the time (well often enough to do it and not remember the little things that cost time when setting up) Its with that in mind, I'm making notes for myself and you guys as well to help you along.
We use MySQL a lot with Oracle SQLDeveloper and many use SQLDeveloper to co-exist between MySQL and Oracle.
For most versions of Oracle Linux, we will install SQL Server from the Yum repository. If you dont have one set up you can configure one under /etc/yum.repos.d. These notes for yum are a reference (blatant copy) from the Oracle Linux Admin guide
Now we are ready to install MySQL. If you havent used yum before play with some of the options to list packages and switch repos as you need them. Its a great tool saving us all lots of time with dependencies.
which now gives me
lastly flush privileges and exit
giving this prompt in mysql
We use MySQL a lot with Oracle SQLDeveloper and many use SQLDeveloper to co-exist between MySQL and Oracle.
For most versions of Oracle Linux, we will install SQL Server from the Yum repository. If you dont have one set up you can configure one under /etc/yum.repos.d. These notes for yum are a reference (blatant copy) from the Oracle Linux Admin guide
- As
root, change directory to/etc/yum.repos.d.#
cd /etc/yum.repos.d - Use the
wgetutility to download the repository configuration file that is appropriate for your system.#
wget http://public-yum.oracle.com/public-yum-release.repoFor Oracle Linux 6, enter:#
wget http://public-yum.oracle.com/public-yum-ol6.repoThe/etc/yum.repos.ddirectory is updated with the repository configuration file, in this example,public-yum-ol6.repo. - You can enable or disable repositories in the file by setting the value of the
enableddirective to 1 or 0 as required.
root@localEl5# yum install mysql-serverroot@localEl5> yum list mysql-server
Loaded plugins: security
el5_latest | 1.4 kB 00:00
Installed Packages
mysql-server.i386 5.0.95-5.el5_9 installed
root@localEl5>root@localEL5> /etc/init.d/mysqld startroot@localEL5> /etc/init.d/mysqld status
mysqld (pid 31298) is running...In general, you can start mysql on the server without a server password in order to set one up for yourself. My one caveat here, is that all this is for development folks, some one with a security hat on will complain (bitterly). I'm going to show you how to clear down all permissions so you can connect from any machine.
root@localEL5> /etc/init.d/mysqld stop
root@localEL5> /etc/init.d/mysqld status
root@localEL5> mysqld_safe --skip-grant-tables &
mysql -uroot
mysql> select user, host, password from user;
 +-------+-------------+-------------------------------------------+
| user  | host         | password                                  |
+-------+--------------+-------------------------------------------+
| root  | localhost    | *2447D497B9A6A15F2776055CB2D1E9F86758182F |
| root  | 192.168.1.201| *2447D497B9A6A15F2776055CB2D1E9F86758182F |
| barry | localhost    | *2447D497B9A6A15F2776055CB2D1E9F86758182F |
+-------+--------------+-------------------------------------------+
mysql> delete from user where user='root' and host ='192.168.1.201';
+-------+--------------+-------------------------------------------+
| user  | host         | password                                  |
+-------+--------------+-------------------------------------------+
| root  | localhost    | *2447D497B9A6A15F2776055CB2D1E9F86758182F |
| barry | localhost    | *2447D497B9A6A15F2776055CB2D1E9F86758182F |
+-------+--------------+-------------------------------------------+
mysql> update user set host='%';
which now gives me
+-------+------+-------------------------------------------+
| user  | host | password                                  |
+-------+------+-------------------------------------------+
| root  | %    | *2447D497B9A6A15F2776055CB2D1E9F86758182F |
| barry | %    | *2447D497B9A6A15F2776055CB2D1E9F86758182F |
+-------+------+-------------------------------------------+
2 rows in set (0.00 sec)
Now, if you want to change your passwords, make sure you do that now. If you are on 5.1 and over secure_auth is set on and old passwords are off by default. In my version 5.0, I need to set them to get new passwords and secure_auth which is default on all mysql clients now. This is done in /etc/my.conf followed by a restart of mysql
old_passwords=0
secure-auth=1

mysql> update user set password=PASSWORD('oracle') where user='root';
lastly flush privileges and exit
mysql> flush privileges;
Lastly, I like my prompts to be informative so, You can also set this in your profile to setup your prompts.
export MYSQL_PS1="\u@\h [\d] > "
It'll give you a prompt like this when I log in with
root@localEl5> mysql -uroot -poracle -Dmysql
giving this prompt in mysql
root@localEL5 [mysql] >
Now, you are all set to connect from SQL Developer to the this instance. We can also install the sample databases from http://dev.mysql.com/doc/index-other.html
Clickable SQL*Plus Errors
Running lots of scripts in SQL*Plus is nice when they are working correctly. But what about when they fail? Its a pain to figure out what went wrong, unless you have a log file and even then, you have to hunt the errors down.
Well, I've had enough of that. Laziness has forced us to create clickable errors in the SQL Worksheet as part of SQL Developer.
Heres a simple example. Take 3 statements, one of which has an obvious error. Hitting F5 runs the script and the errors now appear in the script output. Notice that they are coloured blue at this point to show us that they are clickable.
When you click on the error, you get taken to the point where you made the error in the worksheet. In this case, line 3. One of the things we wanted to do as much as possible when doing this was to keep tabs on the error should we change the file. Above, I add a few lines and return to click on the error and it brings us to the right spot again. In this instance, line 5.
The same thing works in files. If we have a problem in a nested file like @test/test.sql, the error is reported and we can click on it in the same way and be brought to the file at the appropriate line and column offset.
Clickable SQL*Plus Scripts
When you have a load of SQL*Plus scripts, they can be a pain to manage and just simply get around.
In the next version of SQL Developer, you'll be able to hold the ctrl key down and click on the file name and have it open up. This also works on mac with the cmd key and clicking on the line.

Remember, hold the ctrl key down on an @file.sql or @@file.sql and the line will be decorated so you can click on it.
In the next version of SQL Developer, you'll be able to hold the ctrl key down and click on the file name and have it open up. This also works on mac with the cmd key and clicking on the line.
Remember, hold the ctrl key down on an @file.sql or @@file.sql and the line will be decorated so you can click on it.
Application Migration - Part 3
Ok, Finally, we have got to part 3 of Application Migration. In Part 1, we outlined a program which runs in Sybase through iSQL. We then followed this, in part 2 with 2 important pieces.
Our rules file is now extended to include replacement rules. Looking at the rules file below, we have the two main sections
The replacement tags are
Now, taking a look at the source we had in Part 1
we can now run the scanner and make the replacements. Using a similar command to the that used in part 1, We can replace code in this script.
Now, we when we look at the file, test.sh again, we have
So, there we a translated file which was running iSQL on Sybase, but is now running SQL*Plus and Oracle specific SQL.
Now, if you are interested, heres what the scanner said as it was running. It prints out individual statements as they are found and where in the source they were found. At the end, the tool summarises what was found and where.
You can download SQL Developer from OTN.
- Recognizers to identify the file types of the source we post
- Rules to identify items within the files and report on the them
In this part, We will take the rules we used for the previous part, and add some replacement rules. So, lets recap. Our recogniser is set for shell files as below.
<?xml version="1.0" encoding="UTF-8"?>
<rulesfile version="1.0" name="Shell file recognizer" description="Recognize .sh files">
  <recognizer name="sh" description="sh recognizer" enabled="true">
    <fileExtension extension="sh" />
    <expression><![CDATA[#!/bin/sh]]></expression>
  </recognizer>
</rulesfile>
Our rules file is now extended to include replacement rules. Looking at the rules file below, we have the two main sections
- The required section, which defines the expressions which are used to see if we should scan a file
- Rules section which can have 3 sections
- Example clause which contains the expression which shows what should be found by the rule.
- Expression clause which defines a regular expression which is used to identify the items to be change
- Replacement clause which can be configured in 3 different stances to cope with different replacements.
Review the file below:
<?xml version="1.0" encoding="UTF-8"?>
<?xml-stylesheet type="text/xsl" href="../schema/scanner.xsd"?>
<rulesfile version="1.0" name="Sample sh scanner rules"
    description="Sample rules to show whats possible" xmlns:xsi="http://www.w3.org/2001/XMLSchema-instance"
    xsi:noNamespaceSchemaLocation="../../schema/scanner.xsd">
    <ruleset name="isql sample rules" enable="true" type="SYBASE"
        description="" source="sh" codetype="isql">
        <required>
            <regex>
                <expression><![CDATA[go|isql]]></expression>
            </regex>
        </required>
        <rules>
            <regex>
                <expression><![CDATA[go *\n]]></expression>
                <replacement type="text"><![CDATA[]]>
                </replacement>
            </regex>
            <regex>
                <expression><![CDATA[use.*\n]]></expression>
                <replacement type="regex"><![CDATA[]]>
                </replacement>
            </regex>
            <regex>
                <expression><![CDATA[isql.*EOF]]></expression>
                <replacement type="regex"><![CDATA[sqlplus barry/barry <<EOF]]></replacement>
            </regex>
        </rules>
    </ruleset>
    <ruleset name="sql sample rules" enable="true" type="SYBASE"
        description="" source="sh" codetype="sql">
        <required>
            <regex>
                <expression><![CDATA[select]]></expression>
            </regex>
        </required>
        <rules>
            <regex>
                <expression><![CDATA[select.*\n]]></expression>
                <replacement type="translator"/>
            </regex>
        </rules>
    </ruleset>
</rulesfile>
The replacement tags are
- Text
- This is the simplest type of replacement, taking the source strings found and replacing them with the string in the replacement tag.
- regex
- The regular expression replacement can either simply replace text, or it can also use regular expressions to rearrange the string that was found. For example, function(a,b,c) can be switched to myfunction(c,a,b)
- Translator
- The translator type allows the user to take the string found and pass it to a language translator denoted by the type. In our example, the type is SYBASE, which will call our sybase translator and translate the source string.
Now, taking a look at the source we had in Part 1
bamcgill-macbook-pro:src bamcgill$ cat test.sh
#!/bin/sh
isql -UMYUSER -PMYPASS -SMYSERVER <<EOF
use pubs2
go
select count(*) from authors
go
select top 5 au_lname,au_fname,postalcode from authors
go
EOF
bamcgill-macbook-pro:src bamcgill$
we can now run the scanner and make the replacements. Using a similar command to the that used in part 1, We can replace code in this script.
bamcgill-macbook-pro:demo bamcgill$ migration -actions=scan -dir=/Users/bamcgill/code/demo/src -rulesdir=/Users/bamcgill/code/demo/rules -inplace=true
Now, we when we look at the file, test.sh again, we have
#!/bin/sh
sqlplus barry/barry <<EOF
SELECT COUNT(*)
  FROM authors ;

SELECT au_lname ,
       au_fname ,
       postalcode
  FROM authors  WHERE ROWNUM <= 5;

EOF
So, there we a translated file which was running iSQL on Sybase, but is now running SQL*Plus and Oracle specific SQL.
Now, if you are interested, heres what the scanner said as it was running. It prints out individual statements as they are found and where in the source they were found. At the end, the tool summarises what was found and where.
bamcgill-macbook-pro:demo bamcgill$ migration -actions=scan -dir=/Users/bamcgill/code/demo/src -rulesdir=/Users/bamcgill/code/demo/rules -inplace=true

Oracle SQL Developer
 Copyright (c) 1997, 2011, Oracle and/or its affiliates. All rights reserved.

Finding files....
Default Application Name

                test.sh
                        3:go

                        5:go

                        7:go

                        2:use pubs2

                        1:isql -UMYUSER -PMYPASS -SMYSERVER <<EOF
                        2:select count(*) from authors

                        3:select top 5 au_lname,au_fname,postalcode from authors

------------------------ Application Results -----------------

Call Breakdown Summary by File
------------------------------
/Users/bamcgill/code/demo/src/test.sh
        3:      go

        1:      use pubs2

        1:      isql -UMYUSER -PMYPASS -SMYSERVER <<EOF
        1:      select count(*) from authors

        1:      select top 5 au_lname,au_fname,postalcode from authors


-------------------------------------------------------------

Call Breakdown Summary
----------------------
        3:      go

        1:      use pubs2

        1:      isql -UMYUSER -PMYPASS -SMYSERVER <<EOF
        1:      select count(*) from authors

        1:      select top 5 au_lname,au_fname,postalcode from authors


-------------------------------------------------------------

File Type Summary
----------------------
         sh      1 file

-------------------------------------------------------------
------------------------    Summary   -----------------------
High Level Overview
-------------------
        7 total calls found
        5 distinct calls found
        1 files scanned
        1 language types
        2 total files in source
        9 lines of code in scanned application
-------------------------------------------------------------
-------------------------------------------------------------
scan completed successfullyYou can download SQL Developer from OTN.
Using History Keys in SQL*Plus
I was working through a bug the other day and using SQL*Plus, which for the most part doesn't annoy me too much. However, one of the things that does, is having to retype lots of stuff. (We dont have that problem in SQL Developer).
Having hunted around for a few minutes, I found rlwrap which is a GNU readline wrapper. All this means is that when we use it on SQL*Plus, it give us keyboard history and user defined completion. I've found a few posts about it too, which are referred to below, but I wanted to do this for our virtual machine.
We use our Oracle Developer Days VM a lot internally as its great for spooling a DB having a full environment ready to play with and test features. I'm using that for this post.
You can download rlwrap from here. There are also RPMs available too. I pulled down the tar ball. Expand it out and you have a bunch of files for a standard build
Firstly, we need to run the ./configure script to find all the dependencies. You can see a cut down version of the output of that below.
checking for tgetent in -lcurses... no
checking for tgetent in -lncurses... no
checking for tgetent in -ltermcap... no
configure: WARNING: No termcap nor curses library found
checking for readline in -lreadline... no
configure: error:

You need the GNU readline library(ftp://ftp.gnu.org/gnu/readline/ ) to build
this program!


[root@localhost rlwrap-0.37]#
Running configure on my system flagged that I didnt have the readline package installed. However, when I went to install it with
[root@localhost ~]# yum install readline
Loaded plugins: security
Setting up Install Process
Package readline-5.1-3.el5.i386 already installed and latest version
Nothing to do
I discovered it was already installed. A quick look through the config.log tho, from the configure process shows that the -lreadline library dependency could not be satisfied. It needed the development package to build.
[root@localhost rlwrap-0.37]# yum install readline-devel
Total download size: 202 k
Is this ok [y/N]: y
Downloading Packages:
(1/2): libtermcap-devel-2.0.8-46.1.i386.rpm              |  56 kB     00:00
(2/2): readline-devel-5.1-3.el5.i386.rpm                 | 146 kB     00:01
--------------------------------------------------------------------------------
Total                                            85 kB/s | 202 kB     00:02
Running rpm_check_debug
Running Transaction Test
Finished Transaction Test
Transaction Test Succeeded
Running Transaction
  Installing     : libtermcap-devel                                         1/2
  Installing     : readline-devel                                           2/2

Installed:
  readline-devel.i386 0:5.1-3.el5

Dependency Installed:
  libtermcap-devel.i386 0:2.0.8-46.1

Complete!
[root@localhost rlwrap-0.37]#
Ok, Now to try configure again..
configure: creating ./config.status
config.status: creating Makefile
config.status: creating filters/Makefile
config.status: creating doc/Makefile
config.status: creating src/Makefile
config.status: creating doc/rlwrap.man
config.status: creating config.h
config.status: executing depfiles commands

Now do:
    make (or gmake)  to build rlwrap
    make check       for instructions how to test it
    make install     to install it

[root@localhost rlwrap-0.37]#
Running the configure again, succeeded creating my makefile. Great. Now run the following to build it and install it in the right place and we should be getting places.
[root@localhost rlwrap-0.37]# make
[root@localhost rlwrap-0.37]# make install
Great. Now, rlwrap is installed in /usr/local/bin and we can use it in our oracle terminal window.
[oracle@localhost rlwrap-0.37]$ rlwrap
Usage: rlwrap [options] command ...

Options:
  -a[password:]              --always-readline[=password:]
  -A                         --ansi-colour-aware
  -b  <chars>                --break-chars=<chars>
Now we can use rlwrap to run SQL*Plus, which gets me back to what I wanted to do at the start. I've kicked this off with the '-c' option.
[oracle@localhost ~]$ rlwrap -c sqlplus barry/barry

SQL*Plus: Release 11.2.0.2.0 Production on Thu Jul 19 17:51:51 2012

Copyright (c) 1982, 2010, Oracle.  All rights reserved.


Connected to:
Oracle Database 11g Enterprise Edition Release 11.2.0.2.0 - Production
With the Partitioning, OLAP, Data Mining and Real Application Testing options

BARRY@ORCL>
Now my up and down arrows work AND with the '-c' option for rlwrap, we get filename completion for free.
BARRY@ORCL> @re
remote.sql          reset_imdbcache     reset_xmldb
repos/              reset_sqldev        reset_xmldb~
reset_OE.sql        reset_svn
reset_apex          reset_xdbPorts.sql
BARRY@ORCL> @re
So, now I'm a lot happier and can zip through loading files and getting my previous statements.
Now, I know there are issues with using this when we redirect files into SQL*Plus, on other blogs like this from Lutz Hartmann, but for me and working with plus in a terminal window, this will do nicely.